How to Remove Rust from Your Vehicle
 I remembered reading this somewhere, “As long as vehicle body panels are made from steel, they’re going to rust.”
Yikes! Not much optimism there. However, no matter what you do, there will always be a hidden part of your vehicle that could already be rusting, or about to start. Of course, to lower the risk of rust starting, owners could apply a paint protection film over the rust-prone areas, such as the edges of the hood. But mind you, once surface rust begins to develop and is left untreated, you could say bye bye to your car.
How to catch and recognize the signs of surface rust that is just starting to build up:
The first sign of rust forming would be blisters in the vehicles paint. This would indicate there is at least surface rust under the paint. Cracks, stone chips and scratches in the vehicles paintwork, where the bare metal of the panel becomes visible, will allow the panel to oxidise as it is exposed to the elements and unless treated immediately, rust will form.
Rust is more of a concern for those that live by the coast or in areas where there is a high level of humidity. This is the reason why regular and meticulous inspections of these spots are important.
Rust repair is not impossible to do. Some owners prefer to do the small fixes themselves but it can be time-consuming. If time is the issue, you can always take your vehicle to your go-to car body and repair centre for the repairs.
First and foremost, you need to get all the required materials:
- Sandpaper (40-, 600- and 1,000-grit)
- Sanding block
- Grease
- Wax Remover
- Primer
- Masking tape
- Poly sheets- to protect other parts of the vehicle
- Microfiber cloth
- Tack rag
- Polishing compound
- Touch-up paint (in order to get the perfect colour match, locate and identify your vehicle’s car manufacturer’s paint code. You can find this in places like the engine compartment).
- Clear coat
Here is an easy to follow step-by-step guide on how to remove rust:

- To protect the other parts of the vehicle from overspray, use the poly sheeting. Ensure you tape the edge of the poly sheeting and you have enough room to blend and touch up.
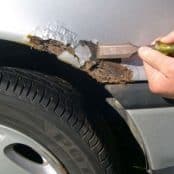
- Using a scraper, pry off the blistered paint.
- Then with a 40 grit sandpaper, sand off the rust spots until the metal is exposed. Sand a larger surface area, so that you’ll have space to feather the edges.
- Now, switch to 120 grit sandpaper and feather the edges of the problematic area.
- Finish the feathering using a 220 grit sandpaper.
- Using the tack rag, remove the specks from the non-sanded area.
- Then to clean the area, use water and dishwashing solution and then rinse with clean water.
- Apply the paint manufacturer’s prep solvent.
- If the rust has created holes and has made the metal uneven, fill them with body filler. Make sure the epoxy primer is dry before adding the filler primer. The self-etching epoxy primer provides a strong bind to bare metal. Spray 2-3 medium coats, allowing 15 minutes in between coats to ensure each coat has settled.
- Spray several coats of filler primer in order to make sure the entire repair area is covered. Blend well and wait for an hour.
- When the epoxy is dry, sand the area using wet 1,000-grit sandpaper.
- Then, wash with clean water and let the area dry.
- Wipe clean using a lint-free cloth and apply 3 heavier coats of lacquer filler primer. Let the lacquer primer dry in between coats.
- Sand the area again using 320-grit sandpaper.
- Let’s prepare to spray the coloured base coat. Hold the spray can at about 12 inches away from the surface and using a left-to-right motion, spray the base coat. Make sure each pass overlaps by ⅓. Build the colour slowly into the repair area and allow 10-15 minutes between coats. Once the area is done well, let it dry for at least 60 minutes.
- In case the area appears uneven after drying, sand the area lightly once again and repeat step 15.
- Once the area is dry again, clean the painted area with a tack rag, then apply the first layer of clearcoat. Gradually spray onto the repaired area to achieve a smooth line.
- Let the clearcoat dry for at least 48 hours before buffing.
- With a microfiber cloth, and buffing compound, hand-buff the repaired area. Avoid using a polishing machine for this step.You should wait at least 30 days before waxing.
This DIY version is not for the faint-hearted. The process cannot be rushed and patience is key. If rust removal is too big of a task for you, book your vehicle in at Bodyteq for a free estimate!