How To: Plastic Bumper Repair Using DIY Repair Kits
Plastic Bumper Repair – How To Guide
 Whether someone else is to blame or it was due to a wrong move, being faced with a scratched, scuffed or cracked bumper is not a pleasant sight.
Facing high costs to get it repaired by a local garage isn’t appealing either, especially when it comes to ensuring they get the colour spot on and do a perfect job.
Modern bumpers now consist of steel structures encased in plastic covers, therefore repairs can be cheaper and easier to fix – which is why we suggest reading this article before splashing out on a new bodywork job.
Assess the damage
If you’re looking for plastic bumper scuff repairs and the damage is minimal, then using a DIY kit at home could just be the answer to saving you a whole load of money. If the damage is more severe, including cracked or split bumpers, the repair will be a little more extensive, involving sanding, sealing, sculpting and painting, therefore not suitable for novices.
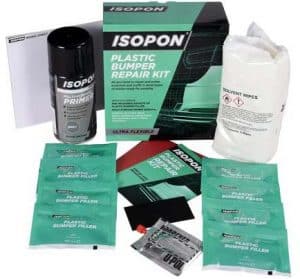
Choosing a Repair Kit
So you’ve assessed the repairs and you’re going to go ahead and fix it yourself. What next?
Firstly, you need to choose the most suitable bumper repair kit – it will contain everything you require to go ahead with the initial repair. The only things that will need to be bought separately are the paint and finishes. Be careful to choose a dedicated bumper repair kit, it contains a flexible filler that can move with the plastic, therefore minimising the risk of future cracks.
Whilst most bumper repair kits are suitable for nearly all types of bumpers, you can confirm the material of your bumper by checking the sticker on the inside which will state what your bumper is made of. Once identified, you can establish the best product for your bumper by confirming with your local car parts shop.
How to use the kit to repair my bumper
Having confirmed the nature of the damage, you can now identify the best route of action for repairing your bumper.
- Scruffs and scratches on the bumper – this can be repaired from the front side
- Crack and splits on the bumper – this will need to be repaired from the front and the back
All work should be carried out in a clean, dry environment. Also, ensure that you take your time with the process to avoid a bad finish.
Repairing the back of the bumper:
- Start with removing your bumper. You can locate small screws around the lights, the wheel wells and around the boot and bonnet edge.
- Before starting any work, the bumper must be thoroughly cleaned, both inside and out, with solvent wipes that are usually provided with the kit. If any grease remains, the filler will fail to bond properly and this can ruin the appearance of the repair.
- Assess the damaged area carefully. In the event that any shards of plastic are sticking up, these will need to be removed with a blade or knife.
- Once removed, sand the area with 80 grit sandpaper and remove any prominent sharp edges. The finish you’re looking for is a rough surface, this will assist with giving the filler something to bond with. Ensure any dust is wiped away with a damp cloth.
- For cracked or split bumpers, line up both sides until they are level, then secure in place with strong masking tape on the front side.
- The repair will then need to be done on the back. If your kit came with a solution to help the filler bond to the plastic, you can apply this now and let it dry.
- Use the plastic filler material and start spreading all over the cracked area on the bumper and beyond. The filler is quick drying, so you may need to work a little faster here.
- Now, cut the bonding mesh and cut it to size but leave one inch past all sides of the damage. Then carefully attach the mesh over the damage to pin both sides of the crack in place.
- Take the plastic filler material again, and apply a liberal layer over the mesh to ensure it is completely covered. Smooth it out and then leave the filler to harden for the stated time on the pack.
Repairing the Front Bumper:
- Remove the masking tape from the front and sand down the damage until the area is a little low and the surface is rough enough for the bond. If the bonding liquid was supplied with your bumper repair kit, this can be applied.
- Start working a liberal amount of the repair filler material onto the damaged bumper area, until the surface of the bumper is a little higher than the surrounding bumper.
- Then use a spreader like a squeegee to smooth out the filler, pushing into any scratches and ensuring they fill to the bottom. If a smoothing film was supplied, apply this and leave to fully dry and harden.
- Once dry, use the 80 grit sandpaper and start sanding the repair are first. Then use a fine grain sandpaper and continue to smooth it out. If you find there’s still gaps or dips, apply another layer of filler and restore to its original contours.
- Use wet fine grit sandpaper and once fully hardened and sand down for a smooth finish, wiping away any dust.
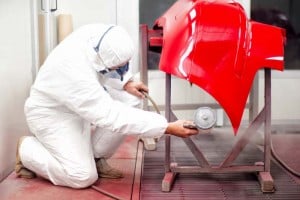
Priming, painting and finishing the bumper
At this point, the initial bumper repair is done, both parts should be completely secured together and now you can move on to priming and painting the bumper. It is very important to ensure you get genuine bumper primer and paint that is flexible enough for plastic to prevent it from cracking or flaking.
Some plastic bumper repair kits come with primer. If not, the finish, paint and primer will need to be purchased separately. A clearcoat is also highly recommended as it will ensure the finished paint remains in good condition and will prevent any further damage.
Once you have the materials, apply a minimum of two coats of primer, paint and clearcoat, leaving enough time between each coat for it to fully dry.
Leave the paint job overnight to ensure it is fully dry before reattaching your bumper to your car!
After any paint repair, we normally suggest waxing the car after a week, preferably by a professional to keep the paint in good condition.
Professional Plastic Bumper Repairs
If you’re not confident at repairing your own bumper with a DIY repair kit, get in touch with BODYTEQ for a professional plastic bumper repair for scuffs, scrapes and cracks.
Bodyteq is London’s leading car body repair specialists and our technicians have the required skillset and equipment to fully repair your bumper and get you back on the road in no time!
Hey! Do you use Twitter? I’d like to follow you if that would be ok. I’m definitely enjoying your blog and look forward to
new posts.
Hi Lavon
Thanks for the enquiry,
Click here to catch us on twitter!
Kind Regards
Jason
BODYTEQ