Car Paintwork Scratches: How To Fix Them!
 Whether it’s from loose stones hitting your paintwork or a careless driver being, well… careless, getting scratches on your car can be a pain! But thankfully, there are a number of methods to fix them.
One of those methods is scratch remover kits, the ultimate DIY. You might be a bit sceptical, thinking do they actually remove the scratches? Well, they do if you use them correctly. So, for your benefit, we’ve put together a guide on when to & not to use the kits and how to use them!
How Deep Is The Car Paint Scratch?
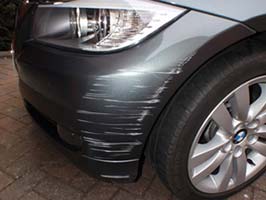
Scratches can vary from light surface ones in the clearcoat to deep paintwork ones. Most cars have paintwork that is sealed and protected by a clearcoat, so light scratches will usually just be in that layer, and maybe the top paint layer. To deal with these type of scratches, using a medium abrasive solution should work, for example, T-cut would be a suitable remover to use.
On the other hand, if your car is suffering from a deep scratch, one that has cut through a few paint layers, then it will need to be handled more carefully, as you will need to reapply paint. As expected, taking your car to a professional bodyshop will ensure the best finish, however, it is possible to do the scratch removal yourself with a DIY kit, if you’re up for the challenge!
If you’ve managed to get a scratch that has dug deep into the paint and exposed the metal, you will need to take it to a professional. The sooner you get it repaired, the better, as metal can rust quite easily and that’s just another headache in itself!
Will I Be Able To Match The Paint Colour?
Before you can even begin your DIY journey, you need to perfectly match the touch-up paint you’re going to use, with the colour of your cars paintwork.
Your car’s paint code can be found in your car, but it can be in different places depending on the make and model of your car. If you’ve scoured your car and can’t seem to find it, you should be able to find it in your owner’s manual or your car’s service history.
After finding a scratch remover kit that matches with your car’s colour code, something to be mindful of is that sometimes the finish doesn’t always look exactly the same, there’s a chance that there might be a slight difference.
So, How Do I Use The Scratch Remover?
 As mentioned before, if you’re dealing with shallow surface scratches that have only affected the clearcoat and the top layer of paint, you can repair them without having to touch up the paint. For more information, have a look at our guide: How To: Use T-Cut Scratch Remover.
However, if you’re dealing with the deeper scratches, and you’re feeling up to the challenge, follow our step-by-step guide below!
One thing to note is that, again, if the scratches reveal the metal beneath the paint, using these scratch remover kits will do more harm than good, so it’s best to take your car to a professional bodyshop for repair.
Step 1
Around the target area (the scratch), ensure it is thoroughly washed. Neglecting to clean the area properly may only result in further damage, as any leftover dirt may be rubbed into the paint leaving marks.
The best way to go about this is to clean the car with car shampoo and water and if needed, use a solvent to remove any wax or oils on the surface of the car, for example, white spirit should do the job!
Dry the washed area well, using a clean microfibre cloth and apply masking tape to the areas surrounding the scratch, to avoid getting paint splatters on undamaged paintwork.
Step 2
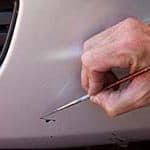
Now it’s time to add primer or paint to the scratch. Using a fine tool, such as a slim paintbrush or a toothpick, apply the liquid into the groove of the scratch, keeping the layer thin and being careful not to let it overflow too much towards the surrounding areas.
Don’t make the mistake of thinking that because it’s a deep scratch, it needs a thick layer of primer or paint, this will only make it dry blotchy, but applying a light layer will allow it to dry evenly. If you feel one layer isn’t enough, you can apply another thin layer after the first has dried (wait around an hour to be safe).
Step 3
It’s ideal to let the paint completely dry and settle overnight. The goal of this step is to level the paint in the scratch with the original paint surrounding the area. So, you’ll need to get a very fine grit wet and dry sandpaper (1200 grit for example) and work it in a circular motion on the target area.
Don’t panic if your paintwork starts to look faded, that’s meant to occur and we’ll tackle that problem later on!
Step 4
Wash the area to remove any paint shavings and dry thoroughly. It’s time to bring back the shine on your paintwork! To accomplish this, you need to buff the target area using a cutting or rubbing compound, this will make the retouched area blend in with the rest of the paint. Be sure to wipe away any left-over liquid and shavings.
Step 5
So you’ve spent all this time and effort repairing the paintwork, you now need to protect your work. If you have a look in your kit, you should find some lacquer, that will act as a clear protective layer over your paintwork, by sealing it.
As you’ve done a few times now, apply a thin coat, leave some time for it to dry and then you can add another coat on top of it for extra protection.
Hopefully, these steps will result in your scratched paintwork looking showroom ready again!
When Should I Avoid Using Scratch Remover?
It all comes down to the extent of the damage, so if you’ve managed to accumulate a collection of scratches on your paintwork (those annoying, deep ones that are grooved in), using a DIY kit will probably be too time-consuming and tricky to use to get that flawless finish you want. So, if you’ve decided it’s too much work and you don’t have the time or confidence to do it, you’re better off contacting a bodyshop and getting booked in!
Speaking of bodyshops, what do you know, we’re those ‘professionals’ mentioned in this article! Here at Bodyteq, we offer a range of paintwork correction services, and I can tell you we have the time and the experience to get the job done! So if you’ve got scratches that need removing, give us a call today for a free quote, we’ll have your paintwork looking revived and fresh in no time!
Hi there, great post! Quick question though, How expensive is it to repaint a car? My brother is wanting to paint his jeep but he doesn’t have a ton of cash to work with. I think this is something you can answer. 🙂
Hi Elwanda
Thanks for the enquiry,
The costs can vary a lot and it will depend greatly on the current condition of the vehicle. As a starting point, I would recommend sending across some pictures of the vehicle, paying attention to any areas of defect (dents/cracks/rust) and from there, we can give you an estimate for what it would cost to restore the vehicles paintwork.
I hope this helps and feel free to get back in touch, should you have any further questions.
Kind Regards
BODYTEQ